We made huge changes to our old house! We were so busy with trying to hurry and get it ready to sell that I quit posting our projects. The awesome thing is that we made such good changes that it sold the day we listed it! We had delays getting into our new home, so I was on a hiatus for several months while we worked on getting into the new house. We're here now! I still don't have my office/craft room set up, and we don't have the garage set up for my husband's projects, so it may be a little while still before I get many new projects posted. But hopefully I can get back to the recipes and get the projects of the old house posted in the meantime.
Thursday, September 13, 2012
Wednesday, March 7, 2012
Repurposed Old Window ~ Turned ~ Necklace Hanger
Thank you, Pinterest! I've seen several versions of this on Pinterest which inspired me to do my own. All of my jewelry has a nice home... except my necklaces. They have a drawer. Necklaces don't belong in a drawer. When you can actually find one to wear, it's so tangled with others that you end up going necklace-less.
My husband and I got permission to grab some old wood and stuff from a property that has an old house, barn, milk barn, and shed on it. They are all falling down. The house basically has no floor anymore, and it is dangerous to go in. We did, however, find some broken windows sitting on what is left of the floor. I grabbed them and took them home.
This is what the window looked like when I got it home:


Gross, right? It had nests all over it, chipped paint, one in tact window, one broken window, and one completely missing window, springs sticking out the sides, and filth galore. I strapped on the face mask and gloves, cleaned it up, scrubbed it down, sanded the loose paint, and took out the glass.

Then I painted it brown, nailed a bunch of nails an inch apart from each other, put a couple of picture hangers on the back, hung it on my wall, and draped my necklaces from it.

And there you have it! I spent absolutely no money on this necklace hanger! I used paint I had in my arsenal, nails I found in my old toolbox from about 5 or 6 years ago, and picture hangers I had in the same toolbox.
Tuesday, March 6, 2012
Barn Wood Buffet
My husband and I have been inspired by Pinterest. We see projects made from trash, and our imagination runs wild. I have always been a trash-to-treasure kind of person, but I never got into big things. All of mine were small hand crafts. Now that I got my husband (the one of us who owns a gazillion tools) hooked on Pinterest, we've been brainstorming together. We're trying to get our rustic-style house fixed up to put on the market so we can move closer to his son's school, and we've been doing many odd jobs ourselves. If you don't have a neatly laid out furniture arrangement, though, the house is just not going to show as good. So... we decided to take that matter into our own hands, too. Since we can't afford to go out and buy all new furniture, we're making it. We located a barn that was falling down. We searched until we figured out who owned it, contacted the owners, and got permission to take some of the wood.
We got the wood (and one sheet of rusted tin) to our house and stared at it for a long time trying to figure out what to make.

We came up with the idea, my husband drew it out and figured the measurements, and we began building.


.JPG)


We got the wood (and one sheet of rusted tin) to our house and stared at it for a long time trying to figure out what to make.

We came up with the idea, my husband drew it out and figured the measurements, and we began building.


.JPG)


Clearly, he's so good to patiently teach me what to do, and he not only allows but encourages me to use his tools.

We used new wood to supplement the old barn wood. We wanted the inside to be solid and sturdy with the new wood, and we wanted to save the old wood for the part that would be seen.

After getting the face and frame built, we cut old boards for the sides.


We took it down off the sawhorses to put the top on it. The boards we used for the top had other boards nailed into it that we had to remove so it would fit. We wanted to keep the look of the old rusty nails, though, so we cut each of them off on the other side.


We used a pocket jig to attach the frame of the doors together. Before attaching the boards, though, we used a router to cut a slot to hold the tin.

I used tin snips to cut out the tin, brushed it down with a wire brush, and sealed in the rust with spray polyurethane. Tim then attached the doors to the unit.

Drawers and I don't get along, so he built all the drawers and installed them.

I cut the tin for them, routed the area of the tin, attached the tin to the drawer fronts, and installed the pulls that I got 50% off at Hobby Lobby. He then put the fronts on the drawers.


And.... Voila!

We got it moved inside and put a few items on it. You can see some of the fresh cut edges. We'll have to weather them to make them match the rest of the wood, but we were so eager to get it inside that we decided we could do that once it was in.


You may recognize those shelves above it from a previous post. We placed it in our breakfast/dining area under those shelves, added a shelf inside each side of cabinet of the buffet, and filled it with all our small appliances that were cluttering up the kitchen. It's amazing what a difference it makes in our kitchen/dining area.

All toll, we spend about $35-$40 dollars on this piece. It could easily sell for $800 or more. It took a lot of time to build, but we definitely had quite a bonding experience through it. We will without a doubt be building more barn wood furniture together!
Stay tuned for our new/old barn door dining table that we are in the process of building.....
Thursday, March 1, 2012
Slow Cooker Chicken Taco Chili
I must thank Pinterest for this recipe, as I often do. I love getting recipes off there. Slow cookers make life so much easier and keep my husband happy. This recipe was no exception. I will definitely be doing it again.


Slow Cooker Chicken Taco Chili
Servings: 10
1 onion, chopped
1 16-oz can black beans
1 16-oz can kidney beans
1 8-oz can tomato sauce
2 cans whole kernal corn
2 14.5-oz cans diced tomatoes w/chilies
1 packet taco seasoning
1 tbsp cumin
1 tbsp chili powder
4 boneless skinless chicken breasts
chopped fresh cilantro
Combine first 9 ingredients in your slow cooker. Place chicken on top and cover. Cook on low for 10 hours or on high for 6 hours. Half an hour before serving, remove chicken and shred. Return chicken to slow cooker and stir in. Top with fresh cilantro. For added flavor (but also added calories) top with sour cream and cheese. It may be more fattening, but it tastes so good!

I added sour cream and cheese to the top, and it was incredible!

Slow Cooker Chicken Taco Chili
Servings: 10
1 onion, chopped
1 16-oz can black beans
1 16-oz can kidney beans
1 8-oz can tomato sauce
2 cans whole kernal corn
2 14.5-oz cans diced tomatoes w/chilies
1 packet taco seasoning
1 tbsp cumin
1 tbsp chili powder
4 boneless skinless chicken breasts
chopped fresh cilantro
Combine first 9 ingredients in your slow cooker. Place chicken on top and cover. Cook on low for 10 hours or on high for 6 hours. Half an hour before serving, remove chicken and shred. Return chicken to slow cooker and stir in. Top with fresh cilantro. For added flavor (but also added calories) top with sour cream and cheese. It may be more fattening, but it tastes so good!
Wednesday, February 15, 2012
Valentine's Day: Gift Set-Up with V-Day Tree
I had plans of making this tree into a cool centerpiece, but we had so many other things going on that it didn't happen. Here's what I did, though. I got an old, dirty terracotta pot from my storage, cleaned it up, and painted it white. I went out in our woods behind our house and cut an appropriate limb off a tree. I spray painted it white then left it outside overnight to dry. The next day I brought it in the house, stuck it in florist foam in the pot, trimmed it down to the right size for our dining table, and covered the foam with Red Hots. My plan was to hang little Valentine's from it and wrap Valentine ribbon around the pot. I didn't get that part done. But it was cute, nonetheless. When I get my Easter decorations done I will show you how I turned this Valentine tree into an Easter tree.
I decided our Valentine's Day celebration would be at home. My husband is one of the few men in America who can get away with forgetting Valentine's Day, Birthdays, Anniversaries, etc., because he has TBI. I know not to expect anything. He usually does an excellent job of pulling through, but to avoid the heartache in case he struggles I go ahead and plan things for us. So my plan was to cook him a nice dinner and have a romantic set-up for him. I wrapped small gifts for him (the ones that I ended up having to leave town and didn't get to do by the day earlier in the month + the new hand planer for day 14), and I placed them around the Valentine's tree. I ran to the store to pick up a few dinner items I had forgotten, and when I got home he had added three more gifts to the table. Woohoo!!!! So... we had appetizers of cheese, olives, wine, and beer... our favorite casual appetizers. This was my set-up:
.jpg)
For dinner I fixed a Blue Cheese Wedge Salad, Steak, and Smashed and Baked Potatoes. All ingredients except the blue cheese and dressing were organic, and the steaks came from a local farmer who grass feeds and finishes his cattle. Even the seasoning I used for the steak was from a local farmer made of all organic ingredients.

I splurged on the dessert by baking a southern classic.... Coca-Cola Cake. I failed to get pics of it, but it was out of this world. My hubby LOVED it... to put it lightly.
Check out the recipes to this dinner on other pages of this blog!
Saturday, February 4, 2012
Valentine's Day: Third Day ~ PEZ!!!
This weekend we had my stepson at our house. Of course I had to let him in on the fun. If he was with us more he would have gotten 14 days, too. I decided to include him while he was here, though, to keep it festive without going overboard and smothering him with 14 gifts at once.


Friday, February 3, 2012
Valentine's Day: Second Day ~ You're My Favorite Goober!
The second day of Valentine's was Goobers, because he's my favorite Goober.


Thursday, February 2, 2012
Valentine's Day: First Day ~ You Rock, Valentine!
I decided to do 14 days of Valentine's this year for my hubby. I went to the store at the end of January and bought a small gift for 13 days. When I say small gift, I mean a piece of candy, sucker, gum, or whatever else I could find which I could use it's name to create a cute saying. Every day I will give one to my husband. On the 14th day I will have an actual gift for him.... probably a new tool.
The first day of Valentine's was.... You Rock, Valentine!

The first day of Valentine's was.... You Rock, Valentine!

Wednesday, February 1, 2012
Wednesday, January 25, 2012
Valentine's Day: Card for the Hubby
Ok... So this one gets a little personal. This is the Valentine's Day card I made for my husband last year. I likely won't reveal this year's until after he gets it. I don't know... we'll see. Since I decorated both the outside and inside, though, I decided to put pics of both on here. Yes, you'll be able to read the personal message that I wrote inside to him. But I don't reckon it's anything so personal that should be kept private.
This card was made on white cardstock using scrapbook paper, ribbons, stamps, felt, and markers.


This card was made on white cardstock using scrapbook paper, ribbons, stamps, felt, and markers.
Front:

Middle:

Back:

Tuesday, January 24, 2012
Valentine's Day: Decorative Jar
Today's Valentine's Day craft is a simple one that I did last year for my stepson's school Valentine's Day party. One other mom and I were the party planners for all the class parties, so we had a blast coming up with decorations and crafts. We had heart shaped suckers for all the kids. They were going to be used for a craft (that I will post later) toward the end of the party. I thought it would be cute to use them as decorations until they were needed for the craft. I took one of my spaghetti jars from my stash, added some cute Valentine's scrapbook paper, edged it with ribbon, and placed the suckers inside. I wish I would've gotten a better picture that day, but this is the best I have. You get the idea, though.


Monday, January 23, 2012
Valentine's Day: Wreath
For the last full week of January, it's time to move on to some Valentine's Day crafts. I've had my Valentine's decorations up since I took down my Christmas ones. If you don't have them yet, though, now is the time to get going.
My first Valentine craft is a wreath. I did this with a wire heart shaped wreath base. I added the layer of red ribbon first, using flower ties at each loop. Once I got that completed all the way around I did the black layer. Next was the zebra ribbon. I used wire ribbon so it would be easier to shape the way I wanted. Again, I used flower ties all the way around. I bought the "LOVE" as pre-cut unfinished wood at Hobby Lobby. I painted the red and black, but it looked too plain for me. So I added the extra designs to it. The picture in the "O" is one of our engagement pictures from a few years ago. I thought it was pretty fitting. I debated on how to attach the LOVE sign to the wreath, but I finally ended up using black jewelry wire. Finally, I added the ribbon to hang it from above.
My first Valentine craft is a wreath. I did this with a wire heart shaped wreath base. I added the layer of red ribbon first, using flower ties at each loop. Once I got that completed all the way around I did the black layer. Next was the zebra ribbon. I used wire ribbon so it would be easier to shape the way I wanted. Again, I used flower ties all the way around. I bought the "LOVE" as pre-cut unfinished wood at Hobby Lobby. I painted the red and black, but it looked too plain for me. So I added the extra designs to it. The picture in the "O" is one of our engagement pictures from a few years ago. I thought it was pretty fitting. I debated on how to attach the LOVE sign to the wreath, but I finally ended up using black jewelry wire. Finally, I added the ribbon to hang it from above.
Sunday, January 22, 2012
Organizing: Kitchen Storage Boxes
This is another project that I did using unfinished craft wood from Hobby Lobby, but if I did it again I would have my husband make the boxes. These were quick and easy creations, but they far beat the cardboard boxes that each of these items are packaged in at the store. I painted them to match my accent colors, added a little ribbon, and cut three layers of letters out of cardstock with my Cricut. Stacking three layers on top of each other gave them a more 3-D look.


Saturday, January 21, 2012
Organizing / Home Decor: Hanging Box Shelves
The next project for my husband was a set of shelves that I saw in a book and wanted. I love a contemporary look, but our house is rustic. So we thought these shelves would be a good mix. I failed to take pics of this project along the way like I did with the laundry room cabinets. Lesson learned. But at least you can see the final. I'm still working on getting them decorated.
He used 3/4 inch birch plywood for these shelves. One 4' x 8' sheet did the entire thing. He used 1/4 inch plywood for the backs of each box. He ironed edge banding onto all the edges to give them a more completed look. Then he stained them and applied polyurethane. I wish I had pictures of how he hung them, because he had to really engineer it up. Those suckers are heavy! They are hung in three separate sections.


He used 3/4 inch birch plywood for these shelves. One 4' x 8' sheet did the entire thing. He used 1/4 inch plywood for the backs of each box. He ironed edge banding onto all the edges to give them a more completed look. Then he stained them and applied polyurethane. I wish I had pictures of how he hung them, because he had to really engineer it up. Those suckers are heavy! They are hung in three separate sections.


Friday, January 20, 2012
Pizza Rice
I'm always looking for meals my stepson will eat. He is going through an unhealthy eating stage, so I have to sneak vegetables and healthy foods into his meals. The slow-cooker recipe magazine Fix-It and Forget-It had one labeled "kid-friendly" called Pizza Rice. I decided to give it a shot. This one is not all natural, so I decided to not put it under the natural recipes tab. You can make some substitutions as I did, though, to make it mostly natural.
The recipe in the magazine called for rice, and I chose brown rice. I used fresh mozzarella that I bought from a farmer, and I shredded it myself. I used fresh mushrooms, too. The only store-bought items I put in my pizza rice were pizza sauce, pepperoni, and black olives (I added the black olives to the recipe). I'm going to look into whether or not any nearby farmers sell pepperoni cuts. If I can find that, I will change it next time, as well. And if anybody has a good natural pizza sauce recipe, I'd love to know it!
This was possibly the easiest recipe I have ever fixed, and it turned out good, too. I will definitely be fixing it again!

Ingredients:
2 cups uncooked rice
3 cups pizza sauce
2 1/2 cups water
4.5 oz. mushrooms, undrained if using canned ones
4.5 oz. pepperoni
4 oz. black olives, sliced
1 cup mozzarella cheese, shredded
Combine rice, pizza sauce, water, mushrooms, pepperoni, and black olives in slow cooker. Stir, set to low, and cook for 3 to 3 1/2 hours. Add cheese just before serving. (I let it sit in the slow-cooker on warm for about 10 minutes to melt the cheese before serving.)
Organizing: Laundry Room Cabinets
One of the problems with our house is lack of storage. We are planning to put our house on the market in the spring, so we are trying to create some good storage areas to add to the appeal. Plus, I tend to be a little ocd. Messes stress me out. My husband got some new tools for Christmas, and he couldn't wait to use them. It took several days because the doctors are trying to teach him to pace himself better so he doesn't knock himself down for several days in a row. Otherwise this could probably be done in a day. But I couldn't be more proud of him for how they turned out.

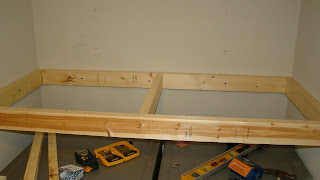


Here was the "Before." I wanted to scream every time I walked in here.

He started with base:

Then he added bracing for support around the middle:

Awww.... Isn't my hubby handsome????

Here is me pretending to do something while wearing my new pink toolbelt that I LOVE!!!

After getting the middle braces, he added the shelves and the top support:

Next came the face frame:

Here it is from a straight-forward angle:

Next he painted the frame:

And finally he added the doors that he built and painted in the garage. (I didn't realize that bottom drawer to the dryer was open when I took this):

The final close-up:

Subscribe to:
Posts (Atom)